
So, you have a new external SSD that looks great. Great choice! You’re already way ahead in terms of speed and durability. But are you getting the most out of it? For most people, a external SSD is just a big, fast folder where they can store files. It’s like buying a big house and only using the living room. What if I told you that you could use a simple, built-in tool to make that one digital room into a multi-room powerhouse of organization, security, and efficiency?
Welcome to the world of splitting things up.
It may seem like learning how to partition an external SSD is something only IT geniuses and super-geeks can do, but I promise you, it’s one of the most useful and easy-to-learn skills you can learn to improve your digital life. It’s what makes your storage smarter, not just bigger.
We’re going to explain the whole process in this ultimate guide. We’ll explain what a “partition” is, why you need them (even if you don’t know it yet), and give you detailed, step-by-step instructions for both Windows and macOS users. No jargon, no confusion—just clear, useful tips to help you get your storage under control.
What is an SSD, and why is an external SSD a game-changer?
Before we start putting up digital walls, let’s quickly go over what we have to work with. A solid-state drive (SSD) is a new type of storage device that uses flash memory, which is the same type of memory that your smartphone uses.
The Hard Disk Drive (HDD) had spinning platters and moving arms, which made it loud and slow. An SSD, on the other hand, is quiet, much faster, and much less likely to break when dropped or bumped.
Adding portability to it makes it a external SSD. You can get to your data quickly from anywhere, and the package is small enough to fit in your pocket. The first step in setting up an SSD is very easy: just plug it in. Setting up the basic process for “install an External SSD” is not hard at all. But you can only really use it when you look beyond plug-and-play.
The Main Idea: What Does It Mean to Split a Drive?
Let’s use a comparison. Think of your external SSD as a huge, empty warehouse. Right now, all of your work documents, family photos, software, and video games are just sitting in the middle of the floor. It works, but it’s not clean and doesn’t work well.
Partitioning is the process of putting up walls inside a warehouse to make separate rooms.
Your computer’s operating system sees a partition as a separate part of your physical drive. Your one 1TB external SSD could show up on your computer as two 500GB drives (E: and F:), or as a 700GB drive and a 300GB drive. They are on the same device, but they work on their own. You can even choose the type of flooring for each “room,” which we call a “file system.” We’ll talk about that later.
This simple act of splitting is the basis for amazing new abilities.
The “Why”: Strong Reasons to Split Up Your External SSD
So we can split the drive. But why do it? Oh, let me count them. This isn’t just a strange way of doing things; it has real, big benefits.
Perfectly Organized: This is the most obvious benefit. You can make separate partitions instead of one big “Downloads” folder. For instance:
“Work Drive”: This is where you keep all of your work-related files, projects, and software.
“Media Hub”: A place for your movies, music, and photo library.
“Game Vault”: a big space just for your growing library of Steam or Epic Games games.
Bulletproof Backups: This is a huge one. You can set up automatic backups on both Windows (with File History) and macOS (with Time Machine). By creating a dedicated partition for these backups, you isolate them from your everyday files. This stops you from accidentally deleting backup data and keeps the automated process clean and quick. For more information, see our guide on how to set up Time Machine correctly.
Run Multiple Operating Systems: This is the best feature for tech-savvy people. You can partition your external SSD so that you can install and use a different operating system on it. Want to try out the newest version of Ubuntu Linux without messing with your Windows computer? Or do you need to run a certain Windows program on your Mac? Make a partition, put the operating system on it, and then you can start your computer from the external drive.
Better Security: Let’s say you deal with private client information. You can make a smaller, separate “partition” for that data and then use tools like BitLocker (Windows) or FileVault (macOS) to encrypt just that partition. Your important data is safe in a digital vault, but your personal media is still unencrypted and easy to get to.
Cross-Platform Compatibility: This is the best choice for people who use both Windows and Macs. You can format one partition with Apple’s APFS (for Mac use) and the other with a format that everyone can read, like exFAT. You can now use the same physical drive to back up your Mac and share files with a Windows PC.
Before You Start: A Must-Have Checklist Before Partitioning
Are you ready to jump in? Please wait a moment. A little bit of planning can save you a lot of time and pain. First, go through this short list.
SAVE YOUR DATA! I’m putting this in all caps and bold so you can see it. Partitioning is usually safe, but it does change the basic structure of your drive. Things can go wrong. Before you start, make sure to back up the data on the external SSD to another drive or a cloud service. No joke. Don’t miss this.
Connect Your External SSD: Make sure the drive is connected to your computer correctly through its USB or Thunderbolt cable. The basic physical installation of the SSD should be done, and you should be able to see the drive on your computer.
Set Your Goal: What do you want to accomplish by partitioning? The answer to this question decides everything else.
Do you need a backup drive? You probably want one big partition.
How to share files between Mac and Windows? You will need at least two partitions that use different file systems.
How to keep work and personal life in order? Two partitions that are about the same size might be just right.
Before you start building the walls, make a plan for your “rooms.”
How to split an external SSD into parts on Windows 10 and 11
Disk Management is a powerful tool in Windows that makes partitioning easy, even though it looks a little old. Here are the steps to follow.
Step 1: Start Disk Management
Pressing the “Windows Key + R” keys at the same time will open the Run dialog. Type “diskmgmt.msc” and hit Enter. You can also choose “Disk Management” from the menu when you right-click the Start button.
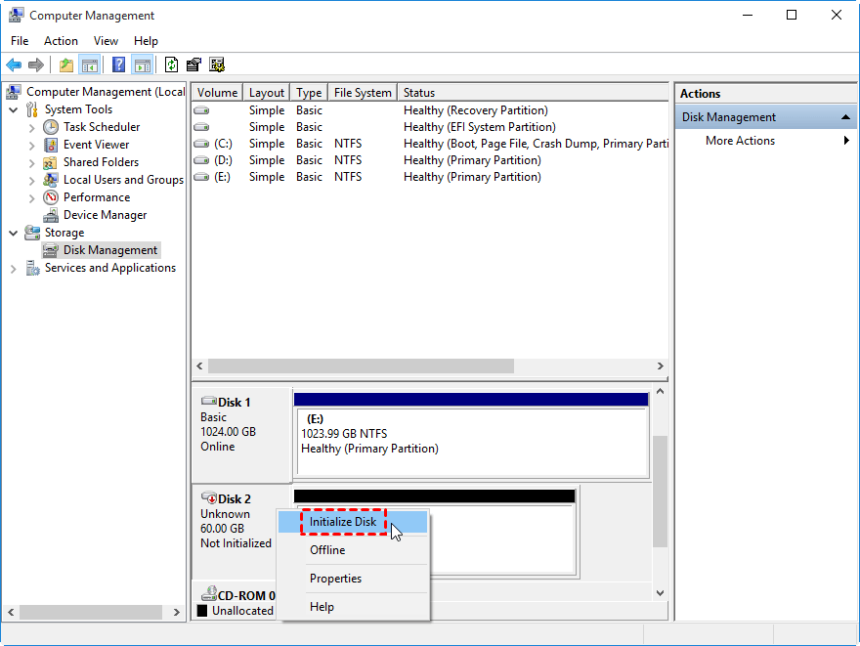
Step 2: Find Your External SSD
The Disk Management window will show you all the drives that are plugged into your computer. Find your external SSD. It will probably say “Disk 1” or “Disk 2” on it and show how much space it has. Be very careful to choose the right drive; you don’t want to change your main system drive (usually Disk 0) by mistake. The “Removable” label can help you figure it out.
Step 3: Make the Current Volume Smaller
You need to make some empty space first if your drive is already formatted as one big volume.
Click the right mouse button on the main part of your external drive.
Click on “Shrink Volume…”
Windows will check the drive for free space to shrink. In the dialog box that pops up, type in how much space you want to take away from the current partition. This will be your new partition. The number is in megabytes (MB), so for a 500GB partition, you would type in about “500000.”
Click “Shrink.” There will now be a black bar next to your original partition that says “Unallocated.” This is where you can put things.
Step 4: Make the New Partition
Now we can use that empty space as a drive.
Click the right mouse button on the “Unallocated” space.
Click on “New Simple Volume…” This will start a wizard.
Click “Next.” Choose the size of the volume (it will use all of the unallocated space by default). Click “Next.”
Give it a Drive Letter. Choose any letter from the list that pops up. This is what the drive will look like in File Explorer. Press “Next.”
**Set up the Partition. This is a very important step!
File System: If you only use Windows, choose NTFS (it’s more stable). If you need to share files with a Mac, choose exFAT.
Volume Label: Name your new partition something that describes what it is, like “Work Files” or “Media Backup.”
Make sure that “Perform a quick format” is checked.
Click “Next” and then “Finish.”
There you go! You can use your new partition right away. It will show up in Disk Management and as a new drive in File Explorer. You can always look at Microsoft’s official documentation for more information.
How to Divide an External SSD on a Mac
The sleek and modern Disk Utility makes things a little easier for Mac users. The process is very easy to understand.
Step 1: Launch Disk Utility
You can find it in the Applications > Utilities folder, or you can just use Spotlight (Cmd + Space) and type “Disk Utility.”
Step 2: Choose the Parent Drive
This is where most people get confused. Your external SSD will be listed in the Disk Utility sidebar, and below it, in an indented format, will be the name of its current volume. You need to click on the top-level, parent drive device and not the volume name below it. The name is usually the name of the company that made it, like “Samsung T7 SSD.”
Step 3: Click the Button for Partition
Click the “Partition” button in the top toolbar after choosing the parent drive.
Step 4: Create a New Partition
You’ll see a pie chart that shows your drive.
To add a new partition, click the plus (+) button below the chart.
You can change the size of the parts in the pie chart by dragging the divider, or you can type in a specific size in the “Size” box for the part you want to change.
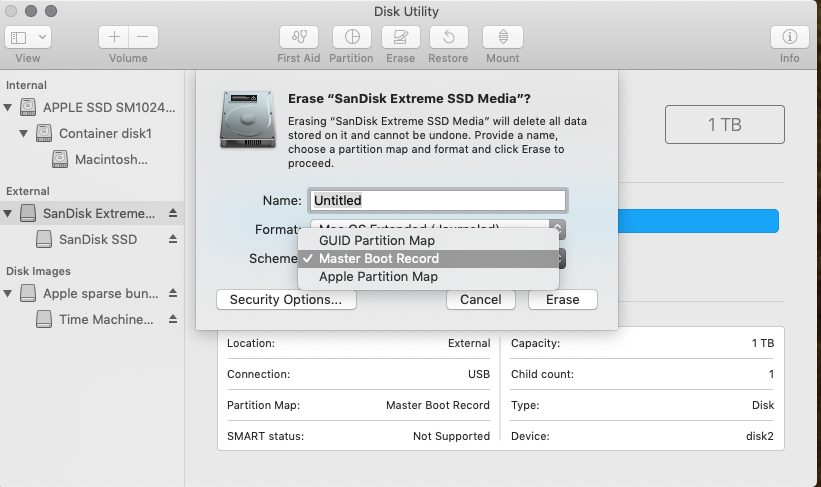
Step 5: Give Each Partition a Name and a Format
You have to name and format each new partition you make.
Name: Give it a name that is clear and descriptive, like “Time Machine” or “Shared Files.”
Format (File System): This is very important.
APFS (Apple File System): This is the best option for newer Macs (macOS 10.13 and later), especially if the drive will only be used with Macs. It works best with SSDs.
Mac OS Extended (Journaled): The old Apple standard. If you need to work with older Macs, use this.
exFAT: The best choice for everyone. Choose this option if you want the partition to be readable and writable on both Windows and Mac computers.
Step 6: Make the Changes
Click the “Apply” button when you’re happy with how your new partitions are set up. Disk Utility will show you that the changes have been made for good. To continue, click “Partition.” The operations will take a few minutes, and then your new partitions will show up on your Desktop and in the Finder sidebar.
Apple’s Support page is a great place to go for more information.
A Simple Guide to Picking the Right File System
We’ve used words like NTFS, APFS, and exFAT. It’s important to choose the right one so that your partition works as it should. Imagine picking the right language for two people to talk to each other.
NTFS (New Technology File System): This is the native language of Windows. It has a lot of features, is safe, and can handle big files.
Use it for: Partitions that you will only use with Windows computers.
Limitation: macOS can read NTFS drives, but it can’t write to them without extra software.
APFS (Apple File System): This is the language that modern macOS uses. It works really well with the speed and design of a SSD.
Use it for: Partitions that you will only use with newer Macs (running High Sierra or later), especially for Time Machine backups or installing macOS.
Limitation: Windows can’t read or write to APFS partitions unless you use third-party software.
exFAT (Extended File Allocation Table): This is the “universal translator.” It is meant to be a lightweight file system that works with both Windows and macOS.
Use it for: The partition you will use to move files between Macs and PCs. It’s the best option for a “Shared” drive.
Limitation: It doesn’t have the advanced features of NTFS and APFS, like journaling, so it’s a little more likely to lose data if the drive is unplugged the wrong way.
Useful Tips for Daily Life: How to Make Your Partitions Work for You
Now that you know how to split up an external SSD, what can you do with that information? I suggest these real-life setups:
The “Digital Briefcase” Setup: Split your drive into two parts. One part, formatted in exFAT, is for all of your current work projects. You can bring it to work, plug it into a client’s computer, or share files with coworkers, no matter what kind of computer they use. Your personal archives and backups go on the second partition, which is formatted in the format of your operating system (APFS/NTFS).
The “Time Capsule” Guardian: Make a partition that is a little bit bigger than your main computer’s hard drive. Set it up as the place where your automatic backups (Time Machine/File History) will go. For Mac, use APFS; for Windows, use NTFS. After that, don’t think about it. Your backups are safe, sound, and separate from the files you use every day.
The “OS Playground”: Are you a developer or just someone who likes technology? Make a 100GB “partition” to install and try out new operating systems, like a Windows Insider build or a new Linux distribution like Fedora. It’s the safest way to try things out without putting your main system at risk.
H2: Questions People Ask All the Time (FAQ)
Q: Does splitting an SSD into parts slow it down?
A: The answer is “no” for almost all users. New SSD controllers and wear-leveling algorithms are smart enough to handle the whole physical drive well, no matter how many logical partitions there are. Any effect on performance is very small and not nearly as important as the benefits to the organization.
Q: Does splitting up an SSD shorten its life?
A: No. The number of times you write to an SSD’s memory cells affects how long it will last. The internal firmware of the drive does “wear leveling,” which makes sure that data is written evenly across all of the drive’s physical cells, not just those in a partition that is used a lot.
Q: Is it possible to change the size of a partition after I’ve made it?
A: Yes, but it can be more complicated. You can resize partitions on both Windows and macOS, but there are some limits, especially if the data is broken up. It’s always best to carefully plan the sizes of your partitions from the start.
Q: How many partitions can I put on my external SSD?
A: It depends on how the partitions are set up. Older MBR (Master Boot Record) systems could only have four main partitions. The GUID Partition Table (GPT) is the modern standard that most new systems and drives use by default. It can handle up to 128 partitions. To put it simply, you can make more than you will ever need.
Conclusion: Let Your External SSD Show Its True Power
You now know how to turn your single-task external SSD into a powerful tool that can do a lot of different things. You’ve gone from just knowing how to “install an External SSD” to knowing how to set it up.
You can make your drive more organized, more secure, and more flexible by taking just a few minutes to partition it. You’re making a system that works better for you, whether you’re a student, a creative professional, a developer, or just someone who wants a more organized digital life.
Your external drive shouldn’t only do one thing. You can make your first partition today by opening Disk Management or Disk Utility. You will be amazed at how much easier it is to do things now that you have it.
https://afriteacher.com/category/trends